Timeline audio, microphone & analysis
What feeds the analysis, the Audio / Inputs button, meters, FFT / smoothing / beat sensitivity.
Everything in OmniMotion that reacts to sound reads from one analysis: a set of live numbers — level, bass, treble, a beat pulse, a tempo — and a few events — beat, onset, bar. This page explains what feeds that analysis, where you see it, and how to tune it. Binding those numbers to visuals is the next page, Visuals that react to sound.
01The model
There is one analysis, and two things feed it:
- Every clip on the timeline with Analyze on, while it is playing. A muted clip still counts; a paused timeline does not.
- The microphone, whenever it is live.
Nothing else does. A sound started by a rule or auditioned with ▶ in Files is heard but not measured. And the microphone is only for sound from outside — a singer, a room, an instrument through an audio interface, another app through a loopback device. It is not the way to analyze the song on your timeline; that song is analyzed by its clip.
The Audio popover shows exactly what is being analyzed right now, so when a visual does not move, that is the first place to look.
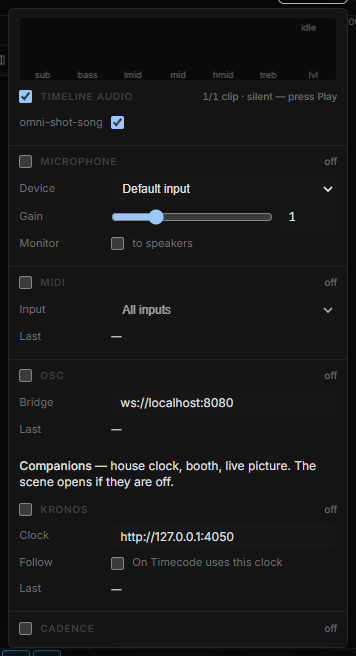
02The Audio button
Audio sits in the right-hand group of the top bar, next to Flow. Its dot is the status: dim when nothing is live, green when something is flowing, red when an input is blocked. When inputs are live, a small count follows the word — hover the button and the tooltip names them (live: mic).
Click to open the popover; click anywhere else or press Esc to close it. It keeps refreshing while it is open.
03Meters
The top of the popover is a live meter: a faint spectrum behind seven bars — sub · bass · lmid · mid · hmid · treb · lvl — a dot at the top right that flashes on every beat, and a readout that says idle, live, or the tempo once one has been found. If the bars sit at zero while the timeline plays, no clip is feeding the analysis: check the next section.
04Timeline audio
One checkbox for all clips, and one per clip underneath. The line beside the title reads the situation for you: no clips, 2/3 clips · live, or 2/3 clips · silent — press Play when clips are switched on but the timeline is stopped.
The per-clip checkboxes are the same Analyze switch you see in the clip's Track settings; a note after each tells you if it is muted, still analyzed or on loop. If there is no clip yet, the section points you to ♪ + Audio in the timeline or ♪ in Files.
05Microphone
Switch the Microphone checkbox on and the browser asks for permission. Once it is granted the state beside the title shows the device name; blocked means permission was refused or no device could be opened.
| Control | What it does |
|---|---|
| Device | Default input, or any audio input the browser sees — audio interfaces and loopback devices appear here. The names fill in after the first permission |
| Gain | A multiplier on the microphone before analysis, 0–4. Raise it for a quiet source |
| Monitor | Also send the microphone to the speakers. Off by default — with speakers and a microphone in the same room this feeds back |
The browser's voice processing — echo cancellation, noise suppression, automatic gain — is switched off on purpose, so the meters see the raw signal and the bands do not "breathe" as the browser adjusts.
06Analysis · master
The folded row at the bottom holds the tuning. Its defaults suit most music; reach for it when the beat detector misses or over-fires, or when a recording is too quiet to move anything.
| Control | Range · default | What it changes |
|---|---|---|
| FFT size | 256 – 4096 · 1024 | Frequency resolution. Larger means finer detail in the spectrum and a slower response; smaller reacts faster |
| Smoothing | 0 – 0.95 · 0.6 | How much each reading blends with the last. Lower is twitchier, higher is calmer |
| Gain | 0.25 – 4 · 1 | A multiplier on all the analysis values. Use it for a quiet recording; it does not change what you hear |
| Beat sens. | 0.5 – 3 · 1.4 | The beat threshold. Lower fires on more hits, higher only on the strong ones |
| Master | 0 – 1.5 · 1 | The volume of everything the scene plays — clips and rule sounds |
07What the analysis gives you
Wherever a value is asked for — the ∿ badge next to a property, a stream in Sentences — the Audio source offers these bands, each 0–1:
| Band | What it measures |
|---|---|
| Level (RMS) | Overall loudness |
| Peak | The loudest instant right now |
| Sub (20–60 Hz) | The rumble under the bass |
| Bass (60–250 Hz) | Kick and bass |
| Low mid (250–500 Hz) | Body of most instruments |
| Mid (0.5–2 kHz) | Voice, guitars |
| High mid (2–6 kHz) | Presence, attack |
| Treble (6–16 kHz) | Hi-hats, air |
| Onset (attack) | How suddenly the energy just rose |
| Beat (pulse 1→0) | 1 on the beat, falling to 0 over about a fifth of a second |
| BPM | The estimated tempo — 0 until a few beats have been heard |
And wherever a trigger is asked for — When … On Signal in Sentences — the Audio family offers three events:
| Signal | Fires |
|---|---|
| Beat | On the detected pulse — never more than four times a second |
| Onset (any hit) | On any sudden hit, on or off the beat |
| Bar (every 4 beats) | On every fourth beat |
08What is saved
The analysis settings and which inputs are switched on are saved with the scene. The chosen microphone device is saved too, but it belongs to a computer: on another machine a missing device is skipped quietly and the scene opens as usual. Microphone permissions are given per browser, not per file.
09Shortcut recap
| Audio in the top bar | Open the popover · Esc closes it |
| Space | Play the timeline — clips only feed the analysis while playing |