Audio clips on the timeline
Adding a file, moving and trimming the clip, the Track settings, loop, mute, analysis.
A song or a voice-over that belongs to the timeline lives there as a clip: it starts, pauses and scrubs with the playhead, and it can feed the analysis that makes visuals react. This page is about clips. For a click sound or an ambience that a rule starts, read Playing a sound from a rule instead — that needs no clip at all.
01Getting a file in
Audio files go into the library first. Open the Files tab in the left panel and drop an mp3, wav, ogg or m4a onto it, or use the import button at the top of the tab. The file appears as a card with a letter glyph instead of a thumbnail.
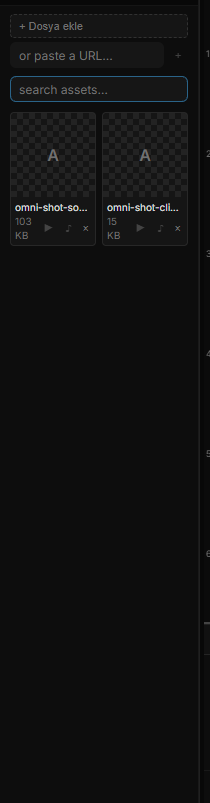
Two buttons sit on every audio card:
- ▶ — listen. It plays the file once, without adding anything to the timeline; it turns into ■ while playing so you can stop it.
- ♪ — put the file on the timeline as a clip. On a file that is already there, the same button removes it again.
02Adding a clip from the timeline
The other door is in the timeline itself. ♪ + Audio in the transport strip lists every audio file in the library that is not on the timeline yet — pick one and it lands as a clip starting at 0 and is selected, so its settings open on the right straight away.
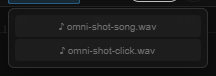
If the list is empty the flyout tells you why: either every file is already on the timeline, or there is no audio in the library yet.
03The clip on the timeline
Clips are rows in the Keys view of the timeline, each with a ♪ name label and a waveform drawn against the same ruler as your keyframes. Press Play (Space) and the sound follows the playhead; scrub the ruler and it scrubs too.

Three gestures shape a clip, and the cursor tells you which one you are about to make:
| Where you drag | What happens |
|---|---|
| The body of the clip | Moves it — Start changes, snapped to frames |
| Its left edge | Trims the beginning: the clip gets shorter from the left and the content stays where it was |
| Its right edge | Sets the Length |
Clicking outside the clip scrubs the playhead, exactly like clicking the ruler. Each drag is one undo step (Ctrl+Z takes the whole move or trim back).
A looping clip is drawn repeating to the end of the scene; a muted one is drawn dimmer. The handles are only on the first repeat — trimming cuts the file, not the repeats. A clip that is still decoding says loading… where the waveform will be.
04The Track settings
Click the ♪ name label (or the clip itself) and the Properties panel switches to the clip. There is nothing else to select at the same time, so the panel shows only the track: its name at the top, the file it plays and its state (loading…, playing, the file length, or error), and one section:
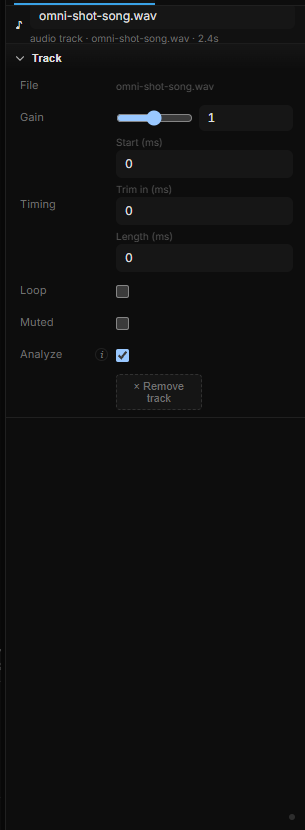
| Control | What it does |
|---|---|
| File | Which library file the clip plays — read-only here; remove the track and add another file to change it |
| Gain | Volume of this clip, 0–2. 1 is the file as recorded |
| Start (ms) | Where on the timeline the clip begins — the same value the drag writes |
| Trim in (ms) | How much of the beginning of the file is skipped — the left-edge drag |
| Length (ms) | How much of the file plays. 0 means "to the end" — the right-edge drag |
| Loop | Start over when the clip ends. A trimmed clip loops over its trimmed length |
| Muted | Silent — but still analyzed (see below) |
| Analyze | Feed the audio analysis from this clip, so visuals can react to it. On by default; turn it off on clips that are just background |
| × Remove track | Takes the clip off the timeline. The file stays in Files |
The numbers and the drags are two views of the same values — drag roughly, then type the exact millisecond.
05Analysis and volume
Every clip with Analyze on contributes to one shared analysis while it plays, together with the microphone when that is live. What the analysis measures, how to tune it, and the overall Master volume are all in the Audio popover in the top bar — see Timeline audio, microphone & analysis. To make something react, continue with Visuals that react to sound.
06Shortcut recap
| Space | Play / pause — clips follow the playhead |
| Drag the clip | Move · left edge trims in · right edge sets the length |
| Click outside the clip | Scrub |
| Ctrl+Z | Undo the last move or trim as one step |