Every layer that has effects has a stack: a list of effect cards that run one after another, top to bottom. This page is the stack itself — how you fill it, arrange it and read it. Where a stack should live is Effects on a layer vs the Effect Layer; making its numbers move is Animating effects.
01Adding an effect
Select a layer, open + Add at the bottom of the Properties panel and choose Effects. The section opens with an empty stack — "Empty — browse the library below" — and a + Effect button. On an Effect Layer the section is already there.
+ Effect opens the catalog:
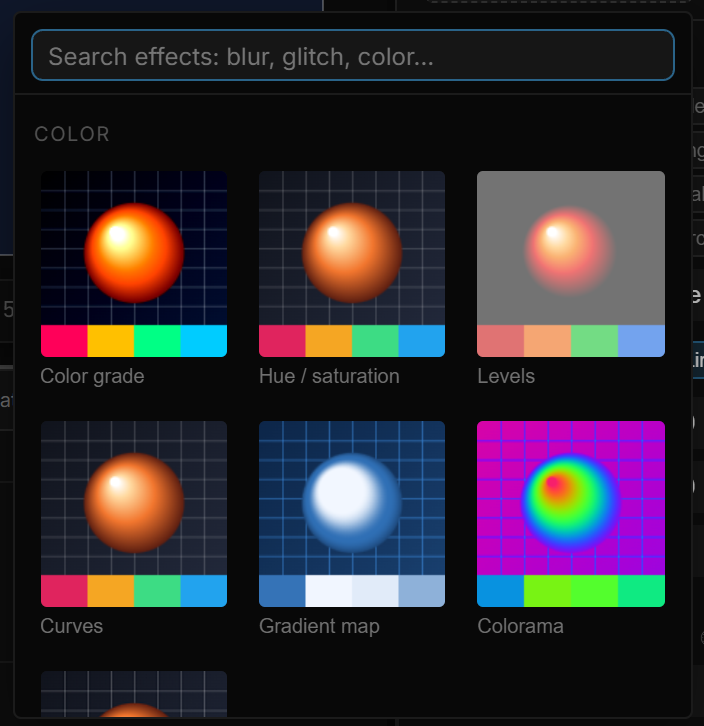
- Search matches names and families — "blur", "glitch", "color" all work.
- Five groups — Color, Blur, Distort, Stylize, Light — in a fixed order.
- Every card is a real preview. The effect's own shader is run once on a shared test picture (a lit sphere, a grid and four color bands), so you can tell Kaleidoscope from Mirror before adding either. Hover a card and the tooltip names the effect and its family.
Click a card and the effect lands on the canvas immediately, with its default settings. The catalog closes; open it again to add another.
02Reading a card

Each effect in the stack is a card with the same header:
| Control | What it does |
|---|---|
| Checkbox | Mutes the effect without removing it — the fastest way to compare with and without |
| Name | Which effect this is |
| ▲ ▼ | Move the card up or down the stack |
| × | Remove this effect — its settings are gone |
Below the header come the effect's own rows: a Preset row when the effect has presets, its parameters, an Advanced toggle when it has more, and a Motion row when it has a clock.
03Order matters
The stack runs top to bottom, and each effect sees the output of the one above it. Swapping two cards is often a different picture:
- Pixelate then Bloom — big square pixels with a soft glow.
- Bloom then Pixelate — the glow is pixelated too; the result is harder and flatter.
- Posterize then Dither — dithering fills in the bands. The other way round, Posterize throws the dithering away.
- Glass first, then a Color grade — the grade tints what the glass shows. Grade first and the glass refracts an already-graded scene.
There is no limit on how many cards a stack holds, but every card is a full pass over the layer's pixels; on a large Effect Layer, ten effects cost ten times one.
04Presets
Many effects open with a Preset row — a handful of buttons that set several parameters at once: Punch, Flat, Mono on Color grade; Barrel, Pincushion, Fisheye on Lens distortion; Lens, Liquid, Frosted, Thin on Glass; Ripple, Strong, Radial, Uncircle on Wave warp, and so on. Hover a preset for a one-line description when it has one.
A preset is a starting point, not a mode: it writes values into the parameters, and you keep editing from there. Nothing remembers which preset you pressed.
05Basic and advanced parameters
Each card shows its everyday parameters first. Parameters you need less often — a Center X / Y, a Seed, the Samples count, the tint of a vignette — sit behind a ▸ Advanced toggle at the bottom of the card. While it is closed, the toggle lists what is inside in small text, so you know whether it is worth opening.
Almost every effect keeps one advanced parameter in common: Mix, 0 to 1, default 1. It blends between the original picture (0) and the full effect (1) — "a little of this effect" without a second layer or an opacity trick.
Some rows only appear when they mean something:
- UV warp shows Strength in Bulge mode, Twirl in Twirl mode and Shear X / Y in Shear mode.
- Wave warp shows Angle only while Propagation is Linear.
- ASCII shows Ink only when Keep color is off, and Glyph count only for the Chars shape.
Choices come as a row of buttons when there are few of them (Radial blur's Spin / Zoom, Mirror's X / Y / XY) and as a drop-down when there are many (Wave warp's seven wave types, ASCII's eight shapes). Switches are checkboxes; colors open the color picker.
06The effect clock
Fourteen effects move on their own: Colorama, Wave warp, Turbulent displace, Ripple shock, Heat mirage, Zigzag shear, Tile scroll, CRT screen, VHS, Film grain, Glitch, Datamosh blocks, Pixel sort and Lens flare. Each has a Speed parameter and a Motion row at the bottom of its card.
Speed is in cycles per second: at 1 the effect's pattern completes one full turn every second; at 0 it stands still. Most of these open at 0.5; Colorama and Lens flare open at 0 and stay still until you raise it.
Motion picks what the clock reads:
| Motion | The effect follows | Use it when |
|---|---|---|
| Timeline (default) | The playhead — scrubbing shows the right moment, and export is repeatable frame for frame | The effect is part of the film |
| Free run | A wall clock — keeps moving while the timeline is stopped, in play mode and in the player | The effect is ambience that should never freeze |
| Static | Nothing — the effect holds still | You want the look, not the motion |
Free run keeps the engine drawing every frame even when nothing else moves, so switch back to Timeline for scenes that should sleep when idle. Hover the Motion field for the same reminder.
Effects that also have a Phase angle (Colorama, Wave warp) add it to the clock: Phase is where the pattern starts, Speed is how fast it advances from there. With Speed at 0, Phase alone lets you pick the frame you like.
Mouse field is the one live effect without a clock: it follows the pointer, so it redraws whenever the pointer moves and has no Motion row.
07The same stack on several layers
Each layer owns its stack. Today there is no copy or paste of a stack between layers, and Duplicate (Ctrl+D) copies the layer without its effects — so the way to give several layers the same look is one Effect Layer placed above all of them (Effects on a layer vs the Effect Layer). If the layers must be processed one by one — because each has its own transparent background, say — add the effect to each and use the same preset as a starting point.
08Shortcut recap
| Add | + Add › Effects › + Effect · type to search the catalog |
| Card | checkbox = mute · ▲ ▼ = reorder · × = remove |
| Advanced | ▸ Advanced at the bottom of a card |
| Clock | Speed = cycles per second · Motion = Timeline / Free run / Static |